Konfigurasi Setting Manual GPRS dan MMS
Mentari
GPRS SETTING
* Profile Name : INDOSATGPRS
* Homepage URL : http://wap.klub-mentari.com
* IP Address : 10.19.19.19
* Bearer : GPRS
* User Name : indosat
* Password : indosat
* APN : indosatgprs
MMS SETTING
* Profile Name : INDOSATMMS
* Connection URL : http://mmsc.indosat.com
* IP Address : 10.19.19.19:8080
* Bearer : GPRS
* User Name : indosat
* Password : indosat
* APN : indosatmms
Matrix
GPRS SETTING
* Profile Name : satelindo
* Homepage URL : http://wap.matrix-centro.com
* IP Address : 202.152.162.250
* Bearer : GPRS
* User Name :
* Password :
* APN : satelindogprs.com
MMS SETTING
* Profile Name : sat-mms
* Homepage URL : http://mmsc.satelindogprs.com
* IP Address : 202.152.162.88
* Bearer : GPRS
* User Name : satmms
* Password : satmms
* APN : mms.satelindogprs.com
IM3
GPRS SETTING
* Profile Name : IM3-GPRS
* APN : www.indosat-m3.net
* User name : gprs
* Password : im3
* Gateway IP : 010.019.019.019
* Homepage : http://wap.m3-access.com
* Data Bearer : GPRS
* Proxy port number : 9201 / 8080
MMS SETTING
* Profile Name : IM3-MMS
* APN : mms.indosat-m3.net
* User name : mms
* Password : im3
* Gateway IP : 010.019.019.020
* Homepage : http://mmsc.m3-access.com
* Data Bearer : GPRS
* Proxy port number : 8081
CSD SETTING
* Dial up number : 366
* Dial type : ISDN
* Username : csd
* Password : im3
* Gateway IP : 010.019.019.019
* Homepage : http://wap.m3-access.com
XL
GPRS SETTING
* CONNECTION NAME : XL-GPRS
* DATA BEARER : GPRS
* ACCESS POINT NAME : www.xlgprs.net
* USERNAME : xlgprs
* PASSWORD : proxl
* IP ADDRESS : 202.152.240.050
* HOMEPAGE : http://wap.lifeinhand.com
MMS SETTING
* CONNECTION NAME : XL-MMS
* DATA BEARER : GPRS
* ACCESS POINT NAME : www.xlmms.net
* USERNAME : xlgprs
* PASSWORD : proxl
* IP ADDRESS : 202.152.240.050
* HOMEPAGE : http://mmc.xl.net.id/servlets/mms
Telkomsel
GPRS SETTING
Connection Name : TselGPRS
Data Bearer : GPRS
Access Point Name : telkomsel
Username : wap
Prompt Password : Off
Password : wap123
Authentication : Normal
IP/Proxy Address : 10.1.89.130
Port : 8000
Homepage : http://wap.telkomsel.com/
Connection Security : Off
Session Mode : Temporary
Login Type : Automatic
GPRS Connection : When Needed
Setting melalui sms:
Mentari :
Ketik SMS: GPRS‹spasi›MerkHP‹spasi›TypeHP
Kirim Ke: 3000
Contoh: GPRS NOKIA 7650
Matrix :
Ketik SMS: GPRS‹spasi›MerkHP‹spasi›TypeHP
Kirim Ke: 3939
Contoh: GPRS NOKIA 7650
IM3 :
Ketik SMS: GPRS‹spasi›MerkHP‹spasi›TypeHP
Kirim Ke: 3939
Contoh: GPRS NOKIA 7650
XL :
Ketik SMS: GPRS‹spasi›MerkHP‹spasi›TypeHP
Kirim Ke: 9667
Contoh: GPRS NOKIA 7650
Telkomsel :
Ketik SMS: S‹spasi›MerkHP‹spasi›TypeHP
Kirim Ke: 5432
Contoh: S NOKIA 7650
Kamis, 08 Januari 2009
Rabu, 07 Januari 2009
Macam - Macam Bunyi BeepKode jika terjadi error pada komputer
BeepKode jika terjadi error(sumber http://www.pchell.com/hardware/beepcodes.shtml)
Standard Original IBM POST Error Codes
1 short beep Normal POST - system is ok
2 short beeps POST Error - error code shown on screen
No beep Power supply or system board problem
Continuous beep Power supply, system board, or keyboard problem
Repeating short beeps Power supply or system board problem
1 long, 1 short beep System board problem
1 long, 2 short beeps Display adapter problem (MDA, CGA)
1 long, 3 short beeps Enhanced Graphics Adapter (EGA)
3 long beeps 3270 keyboard card
IBM POST Diagnostic Code Descriptions
100 - 199 System Board
200 - 299 Memory
300 - 399 Keyboard
400 - 499 Monochrome Display
500 - 599 Color/Graphics Display
600 - 699 Floppy-disk drive and/or Adapter
700 - 799 Math Coprocessor
900 - 999 Parallel Printer Port
1000 - 1099 Alternate Printer Adapter
1100 - 1299 Asynchronous Communication Device, Adapter, or Port
1300 - 1399 Game Port
1400 - 1499 Color/Graphics Printer
1500 - 1599 Synchronous Communication Device, Adapter, or Port
1700 - 1799 Hard Drive and/or Adapter
1800 - 1899 Expansion Unit (XT)
2000 - 2199 Bisynchronous Communication Adapter
2400 - 2599 EGA system-board Video (MCA)
3000 - 3199 LAN Adapter
4800 - 4999 Internal Modem
7000 - 7099 Phoenix BIOS Chips
7300 - 7399 3.5" Disk Drive
8900 - 8999 MIDI Adapter
11200 - 11299 SCSI Adapter
21000 - 21099 SCSI Fixed Disk and Controller
21500 - 21599 SCSI CD-ROM System
AMI BIOS Beep Codes
1 Short Beep One beep is good! Everything is ok, that is if you see things on the screen. If you don't see anything, check your monitor and video card first. Is everything connected? If they seem fine, your motherboard has some bad chips on it. First reset the SIMM's and reboot. If it does the same thing, one of the memory chips on the motherboard are bad, and you most likely need to get another motherboard since these chips are soldered on.
2 Short Beeps Your computer has memory problems. First check video. If video is working, you'll see an error message. If not, you have a parity error in your first 64K of memory. First check your SIMM's. Reseat them and reboot. If this doesn't do it, the memory chips may be bad. You can try switching the first and second banks memory chips. First banks are the memory banks that your CPU finds its first 64K of base memory in. You'll need to consult your manual to see which bank is first. If all your memory tests good, you probably need to buy another motherboard.
3 Short Beeps Basically the same thing as 2 beeps. Follow that diagnosis above.
4 Short Beeps Basically the same thing as 2 beeps. Follow that diagnosis above. It could also be a bad timer
5 Short Beeps Your motherboard is complaining. Try reseating the memory and rebooting. If that doesn't help, you should consider another motherboard. You could probably get away with just replacing the CPU, but that's not too cost-effective. Its just time to upgrade!
6 Short Beeps The chip on your motherboard that controls your keyboard (A20 gate) isn't working. First try another keyboard. If it doesn't help, reseat the chip that controls the keyboard, if it isn't soldered in. If it still beeps, replace the chip if possible. Replace the motherboard if it is soldered in.
7 Short Beeps Your CPU broke overnight. Its no good. Either replace the CPU, or buy another motherboard.
8 Short Beeps Your video card isn't working. Make sure it is seated well in the bus. If it still beeps, either the whole card is bad or the memory on it is. Best bet is to install another video card.
9 Short Beeps Your BIOS is bad. Reseat or Replace the BIOS.
10 Short Beeps Your problem lies deep inside the CMOS. All chips associated with the CMOS will likely have to be replaced. Your best bet is to get a new motherboard.
11 Short Beeps Your problem is in the Cache Memory chips on the motherboard. Reseat or Replace these chips.
1 Long, 3 Short Beeps You've probably just added memory to the motherboard since this is a conventional or extended memory failure. Generally this is caused by a memory chip that is not seated properly. Reseat the memory chips.
1 Long, 8 Short Beeps Display / retrace test failed. Reseat the video card.
Phoenix BIOS Beep Codes
These audio codes are a little more detailed then the AMI codes. This BIOS emits three sets of beeps. For example, 1 -pause- 3 -pause 3 -pause. This is a 1-3-3 combo and each set of beeps is separated by a brief pause. Listen to this sequence of sounds, count them, and reboot and count again if you have to.
1-1-3 Your computer can't read the configuration info stored in the CMOS. Replace the motherboard.
1-1-4 Your BIOS needs to be replaced.
1-2-1 You have a bad timer chip on the motherboard. You need a new motherboard.
1-2-2 The motherboard is bad.
1-2-3 The motherboard is bad.
1-3-1 You'll need to replace the motherboard.
1-3-3 You'll need to replace the motherboard.
1-3-4 The motherboard is bad.
1-4-1 The motherboard is bad.
1-4-2 Some of your memory is bad.
2-_-_ Any combo of beeps after two means that some of your memory is bad, and unless you want to get real technical, you should probably have the guys in the lab coats test the memory for you. Take it to the shop.
3-1-_ One of the chips on your motherboard is broken. You'll likely need to get another board.
3-2-4 One of the chips on your motherboard that checks the keyboard is broken. You'll likely need to get another board.
3-3-4 Your computer can't find the video card. Is it there? If so, try swapping it with another one and see if it works.
3-4-_ Your video card isn't working. You'll need to replace it.
4-2-1 There's a bad chip on the motherboard. You need to buy another board.
4-2-2 First check the keyboard for problems. If nothing, you have a bad motherboard.
4-2-3 Same as 4-2-2.
4-2-4 One of the cards is bad. Try yanking out the cards one by one to isolate the culprit. Replace the bad one. The last possibility is to buy another motherboard.
4-3-1 Replace the motherboard.
4-3-2 See 4-3-1
4-3-3 See 4-3-1
4-3-4 Time of day clock failure. Try running the setup program that comes with the computer. Check the date and time. If that doesn't work, replace the battery. If that doesn't work, replace the power supply. You may have to replace the motherboard, but that is rare.
4-4-1 Your serial ports are acting up. Reseat, or replace, the I/O card. If the I/O is on the motherboard itself, disable them with a jumper (consult your manual to know which one) and then add an I/O card.
4-4-2 See 4-4-1, but this time is your Parallel port that's acting up.
4-4-3 You math coprocessor is having problems. Run a test program to double-check it. If it is indeed bad, disable it, or replace it.
Low 1-1-2 Your motherboard is having problems
Low 1-1-3 This is an Extended CMOS RAM problem, check your motherboard battery, and motherboard.
Senin, 22 Desember 2008
Membuat Konfigurasi hmailserver administrator lewat webmail
Membuat Konfigurasi hmailserver administrator lewat webmail
Untuk mengkonfigurasi / setting email dapat juga dilakukan melalu webmail ( webmail yang telah tersedia di hmailserver adalah PHPwebadmin ) yang salah satunya dengan menggunakan fasilitas wampserver yang kemarin kita buat,langsung saja kita melakukan caranya adalah.
1.Membuat alias name

Setelah dibuat lalu save dan perhatikan lokasinya jangan sampai salah.
Masuk ke C:\Program Files\hMailServer\PHPWebAdmin lalu kopi file config-dist.php dan paste ditempat yang sama lalu ubah namanya menjadi config.php lalu buka file config php tersebut lalu lakukan perubahan seperti dibawah.

Kemudian save lalu restart wampserver anda.
Langkah selanjutnya mentest di browser

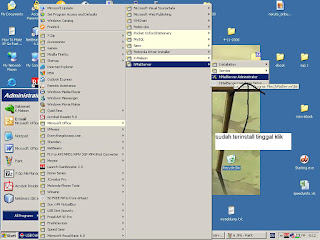
Lalu nloginlah masuk sesuai dengan yang kita buat di hmailserver administrator kemarin yaitu username:administrator dan password:admin lalu klik ok dan akn muncul seperti gambar dibawah ini.

ika tampilan diatas muncul maka anda berhasil melakukan setting dengan benar,cukup mudah kan,cukup sekian dari saya kritik dan saran kirim ke ibaskorn@gmail.com, terima kasih wasalam.
Untuk mengkonfigurasi / setting email dapat juga dilakukan melalu webmail ( webmail yang telah tersedia di hmailserver adalah PHPwebadmin ) yang salah satunya dengan menggunakan fasilitas wampserver yang kemarin kita buat,langsung saja kita melakukan caranya adalah.
1.Membuat alias name

Setelah dibuat lalu save dan perhatikan lokasinya jangan sampai salah.
Masuk ke C:\Program Files\hMailServer\PHPWebAdmin lalu kopi file config-dist.php dan paste ditempat yang sama lalu ubah namanya menjadi config.php lalu buka file config php tersebut lalu lakukan perubahan seperti dibawah.

Kemudian save lalu restart wampserver anda.
Langkah selanjutnya mentest di browser

Lalu nloginlah masuk sesuai dengan yang kita buat di hmailserver administrator kemarin yaitu username:administrator dan password:admin lalu klik ok dan akn muncul seperti gambar dibawah ini.

ika tampilan diatas muncul maka anda berhasil melakukan setting dengan benar,cukup mudah kan,cukup sekian dari saya kritik dan saran kirim ke ibaskorn@gmail.com, terima kasih wasalam.
Selasa, 16 Desember 2008
Konfigurasi Webmail hmailserver di windows (bag 3) terakhir
Konfigurasi Webmail hmailserver di windows dengan wampserver (bag 3 /terakhir)
Lanjutan Langkah ketiga yaitu seting di squirellmailnya yaitu membuat file config.php dengan cara:

Lakukan editing sesuai gambar dibawah

Setelah di edit jangan lupa disave,jarak tulisan yang dalam lingkaran seberannya jaraknya jauh ini didekatkan supaya jelas, jd anda find satu persatu saja sesuai nama2 tulisan didalam lingkaran diatas.
Konfigurasi selesai kemudian restart wampserver anda lalu panggil dengan membuka browser dengan mengetikkan http://127.0.0.1/mail atau http;//noip/mail akan muncul gambar dibawah ini:

Berikut diatas jika sudah muncul berarti webmail anda berhasil aktif,kemudian masukan usernamenya admin@domainku.com dan password admin1 sesuai yang telah kita buat di hmailserver administrator dan akan muncul tampilan sebagai berikut.

Saya sudah bisa berhasil masuk berarti webmail mail berhasil dibuat,sekian tutorial ini cukup menguras tenaga ya,mudah2an tutorial ini bermanfaat dan sebagai alternative email server untuk small office yang gratis dan bas on windows,kritik dan saran kirim ke ibaskorn@gmail.com ,terima kasih atas perhatinannya wasalam.
Konfigurasi Webmail hmailserver di windows (bag 2)
Konfigurasi Webmail hmailserver di windows dengan wampserver (bag 2)
Langkah kedua lanjutan konfigurasi webmail hmailserver di windows yaitu sepertibawah :
1.Buat direktori seperti digambar

2.)Copy hasil extrakan folder squirrelmail ke c:\wamp\apps seperti pada gambar dibawah

3.Langkah selanjutnya buat alias dengan nama mail.conf editingnya dengan notepad di lokasi c:\wamp\alias\mail.conf lihat gambar sebagai berikut.

Berikut isi data mail.conf dibuka dengan notepad

Jika ingin semua ip diizinkan tinggal rubah 127.0.0.1 dengan all
Cukup sekian langkah kedua yaitu langkah seting alias,tempat pertama selanjutnya langkah ke tiga editing dengan php coder, kritik dan saran kirim ke ibaskorn@gmail.com,terima kasih wasalam
Konfigurasi Webmail hmailserver di windows (bag 1)
Konfigurasi Webmail hmailserver di windows dengan wampserver
Kali ini saya akan membuat webmail hmailserver diwindows dengan wampserver,ini dilakukan jika hmailserver sudah berjalan aktif langkah ini baru bisa dilakukan. Langsung saja persiapan awal adalah mempersiapan program2 yang harus siap dapat didownload secara bebas gratis program2 yang saya pakai ini sebagai berikut yaitu:
1.WampServer2.0c.exe dapat didownload di http://www.wampserver.com
Wampserver ini program sebagai server apachenya
2.php editor saya menggunakan editor php php coder2 beta dapat didownload di
www.php.net editor bisa apa saja tergantung anda.
3.squirrelmail-1.4.15.tar dapat ddidownload di http;//www.squirrelmail.org
merupakan webmail yang saya pakai untuk praktek sekarang.
Langkah awal setelah program ketiga diatas siap yaitu melakukan langkah pertama yaitu installasi program pertama yang saya install yaitu wampserver2.0.oc


Tunggu sebentar

Sekarang Test apakah wampserver berjalan dengan kemaun kita dengan cara panggil menggunakan web browser dengan cara ketikan di address http://localhost atau http://127.0.0.1 atau bilamana terhubung dengan jaringan http://noipku seperti gambar dibawah:

Lihat gambar diatas berarti wampserver berjalan selanjutnya kita install phpcoder2 beta


Setelah finis berarti anda sudah dapat menggunakan php coder yaitu editor langkah selanjutnya mengextrak squirellmail program ini tidak perlu di install karena hanya di extrak saja cranya seperti gambar dibawah:

Cukup sekian langkah pertama installasi program sudah selesai jika ada kritik dan saran kirim ke ibaskorn@gmail.com, terima kasih wasalam.
Senin, 15 Desember 2008
Membuat mail server pop dengan hMailServer di WinXP
Kali ini saya akan membuat mail server di windows xp dengan software hmailserver 4.4 setelah anda download dari situs http://www.hmailserver.com langkah pertama melakukan instalasi di computer seperti langkah berikut dibawah.
Gambar2 langkah proses installasi


Lalu setelah diklik next akan muncul tampilan finish
Cara installnya cukup mudah kan tingall klak klik,selanjutnya langkah kedua yaitu tahap konfigurasi mail server pop3
Langkah kedua
Lalu kan muncul tampilan hmailserver administrator yang digunakan untuk mengkonfigurasi mail server pop


Setelah ini konfigurasi standart sudah cukup anda bisa mentestnya langsung,berikut saya test dengan outlook express berikut konfigurasi setingan pop3 di outlook express seperti gambar dibawah ini.


Saya sudah mentestnya dan hasilnya seperti diatas,hmailserver ini software mail pop3 yang bersifat opensource yang dapat didownload dan dipakai dengan gratis, mungkin inilah salah satu alternative untuk mail server berbasis windows untuk small office,pada tulisan kali ini hanya membahas cara installasi dan konfigurasi standartnya saja padahal di hmailserver ini masih banyak manfaatnya,yan bilamana dipelajari dengan mendalam mungkin fasilitas2nya mungkin yang anda inginkan,tapi tulisan ini hanyalah sebatas ini saja,saya rasa cukup sekian mohon maaf atas kesalahan penulisan,kritik dan saran kirim ke ibaskorn@gmail.com , sekian dan wasalam.
Gambar2 langkah proses installasi


Lalu setelah diklik next akan muncul tampilan finish
Cara installnya cukup mudah kan tingall klak klik,selanjutnya langkah kedua yaitu tahap konfigurasi mail server pop3
Langkah kedua

Lalu kan muncul tampilan hmailserver administrator yang digunakan untuk mengkonfigurasi mail server pop


Setelah ini konfigurasi standart sudah cukup anda bisa mentestnya langsung,berikut saya test dengan outlook express berikut konfigurasi setingan pop3 di outlook express seperti gambar dibawah ini.


Saya sudah mentestnya dan hasilnya seperti diatas,hmailserver ini software mail pop3 yang bersifat opensource yang dapat didownload dan dipakai dengan gratis, mungkin inilah salah satu alternative untuk mail server berbasis windows untuk small office,pada tulisan kali ini hanya membahas cara installasi dan konfigurasi standartnya saja padahal di hmailserver ini masih banyak manfaatnya,yan bilamana dipelajari dengan mendalam mungkin fasilitas2nya mungkin yang anda inginkan,tapi tulisan ini hanyalah sebatas ini saja,saya rasa cukup sekian mohon maaf atas kesalahan penulisan,kritik dan saran kirim ke ibaskorn@gmail.com , sekian dan wasalam.
Langganan:
Postingan (Atom)
-
 Bahaya 3,5 G Pada Saat Anda Terhubung Ke Internet Pada PC anda. Kali Ini saya akan mengukapkan bahaya 3,5 G di PC anda bilamana anda lengah...
 -
 Komponen – komponenn Java di NetBeans (JLabel , JTextField , JButton JCheckBox , JRadioButton , JTextArea , JComboBox) Sekarang ini saya aka...
 -
 Pada tulisan kali ini saya akan menerangkan bagaimana melakukan backup database mysql di windows dengan menggunakan file bat. Jika anda memb...